
Blog
Welcome

Recent posts
SEARCH RESULTS FOR: Workflow

We're describing the perfect way to send us your print-and-bind order... After exporting your files you definitely shouldn't jump straight to LabFTP and send us the files - we wouldn't know what to do with them! Instead, always use the Remix Order Wizard. (You'll find it under the Album menu). Remix will validate your order and create an order "bundle" that contains everything we'll need to process your order - provided you follow these instructions: 1. Run your order through the Send Order Wizard. You'll find a tutorial here. The Wizard will ask what service you want (eg Print & Assemble) To View More >>

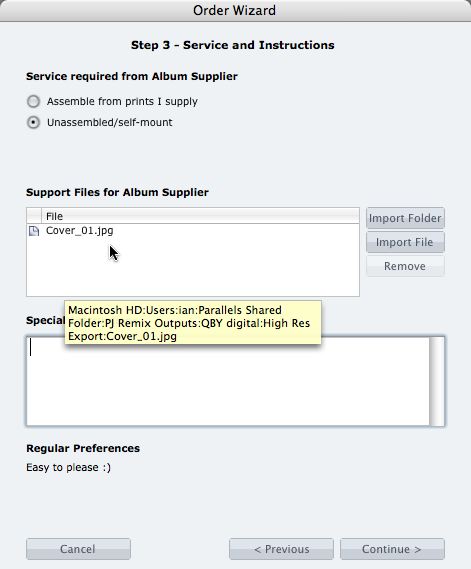
What if you want us to print your cover image, but nothing else? 1. When you fire up the Remix Order Wizard , choose either the "Assemble From Prints Supplied" or Don't Assemble" option. 2. On the same screen the Wizard will offer a place to include "support files" for your album supplier. Open your folder of High-Res Export files and drag in a copy of the cover image (don't double up by sending it to your lab to print as well). 3. Remix may ask you if you want us to print the cover image (generally it'll be obvious what you want, in which case Remix won't ask). Be sure to say Yes. 4. When the To View More >>
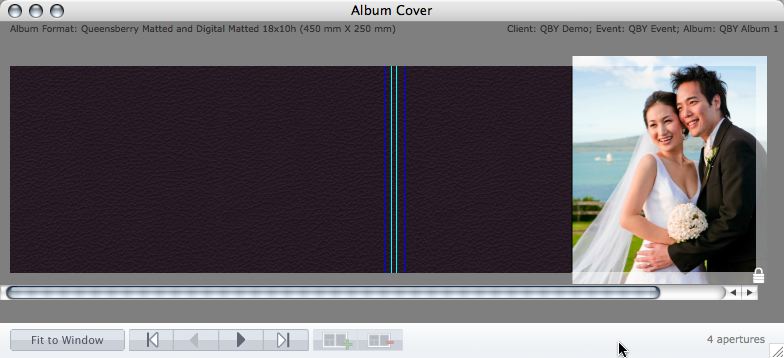
Cover layout design in PJ Remix Here are the first steps in preparing a perfect, hassle-free print-and-bind order, really fast. 1. First, upgrade to PJ Remix. If you have already, thank you. 2. Use Remix to design your cover as well as your page layouts. You'll get to frame and crop the cover image yourself, see exactly what it looks like and be sure that it looks good. For example, here you can see how much of the image in the photo front cover layout above has been cropped away. No problem in this case, but many images won't be suitable: 3. Export your cover AND page layouts using Remix's Export To View More >>
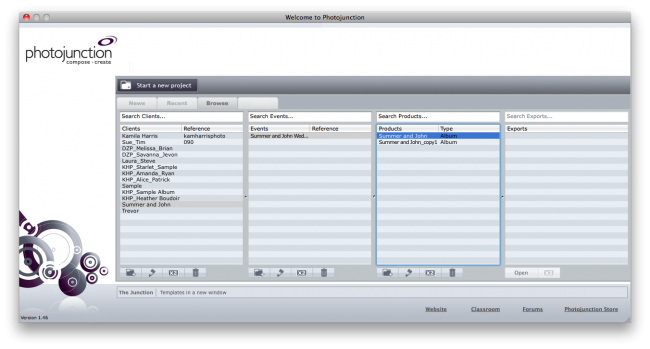
As promised in our recent post about the Photojunction Welcome screen, I wanted to take some extra time to go over the Browse tab with some suggestions to maybe make your workflow smoother. The first column is your Client column. This seems fairly self-explanatory right? In column 2 your clients could have multiple Events. For example, an engagement shoot, wedding, day-after session, maternity shoot, newborn shoot, and then family shoot. Wouldn't it be wonderful if every client were booking that many shoots? Each event can then have multiple Products (column 3). For a wedding, you might create To View More >>

Photojunction also harnesses the power of Photoshop for you during the export stage of the workflow, when you can open and edit exported page layouts in Photoshop from within Photojunction, just as you did the original image files. After you export your high-res page layouts (almost always using Photoshop) they become visible in the Export Layouts window. The layout files will have been saved to your hard disk, and so under your care and control, and many people want to work on them before printing. But you need to take care. If you rename or move the files, for example, Photojunction won’t To View More >>
Email: info@queensberry.com
Free Phone Numbers:
New Zealand: 0800 905 905
Australia: 1800 146 251
USA: +18668350851
UK: 0800 808 5271
Canada: +1 855 581 0370